Pretend Play on a Penny: The Baby Doctor is in

Pretend Play Idea Baby Doctor

Do you have any baby doll lovers in your house? My daughter is definitely one! She’s spent a lot of time around babies with me in the nursery at church, so it is so sweet to watch her imitate me as she hugs them, feeds them, rocks them, and of course then sends them right to time-out! (Yea that last one may be an imitation from home.)

This pretend play idea was inspired by my childhood. As a young girl, I had a huge love for cabbage patch dolls. Remember those? They were magical, chubby babies that grew right out of cabbages—Who thinks of these things? Anyways, I remember visiting the Cabbage Patch Doll factory with my family as a kid, and being in complete awe of the nursery at the factory! I remember the “nurses” who hurriedly walked around while tending to newly “delivered” babies. At that moment, my six-year-old mind was made up; I was going to be a baby doctor!

While I obviously did not end up following my six-year-old dream, I can still remember the many days of playing “baby doctor” at home, and how much I enjoyed it.

So, when trying to think of a new pretend play idea for my mini-me, I rediscovered this childhood playtime favorite.

Baby Doctor

Pretend Play Idea Baby Doctor

Items We Used:

Babies

Clear Plastic Shoe Boxes

TV Stand (Shelves, Ottomans, Chairs, etc. would work too)

Dr. Supplies (Nose syringe, stethoscope, thermometer, cotton balls, etc.)

Baby Supplies (Diapers, blankets. pacifiers, bottles, etc.)
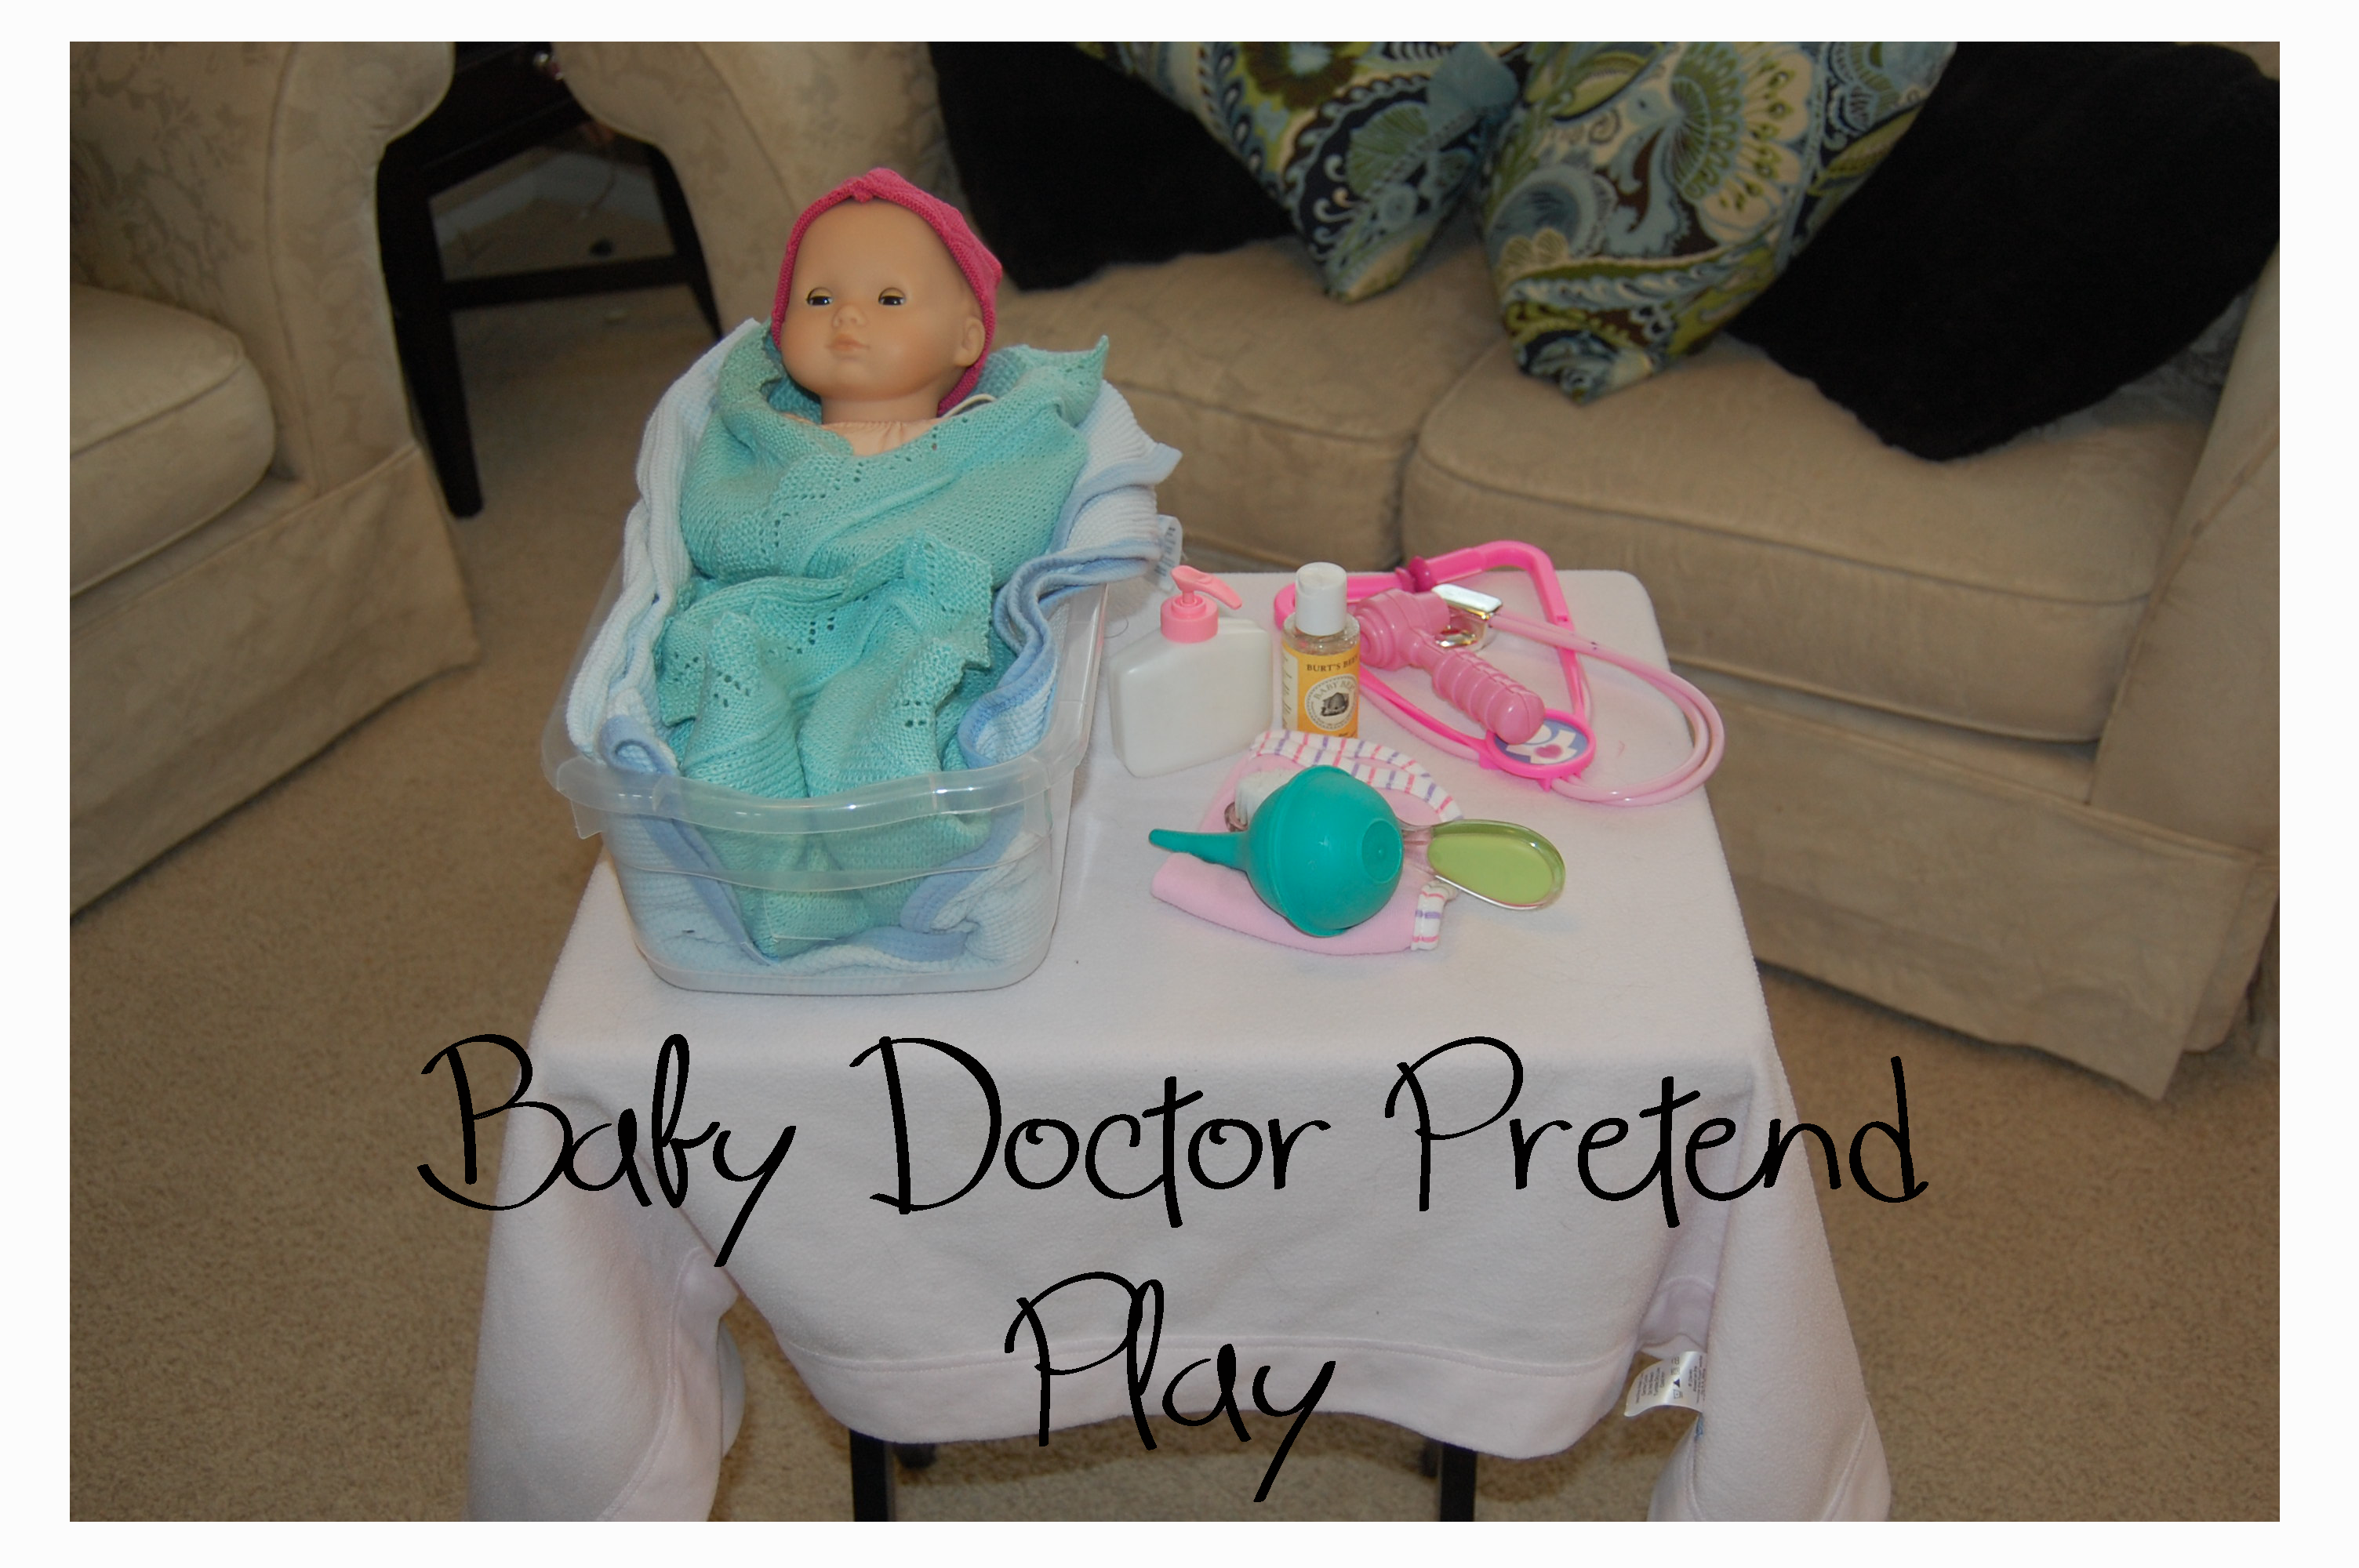
Ready, Set, Play!

We used the clear plastic shoe boxes as bassinets and put them up on a TV stand. We used an ottoman as the baby care center, and put down a blanket and baby care supplies. Here are some suggestions for supplies: empty shampoo bottle, washcloth, hairbrush, cotton balls, hats, diapers, and pacifiers. We also got out a pretend play doctor kit with a stethoscope, blood pressure cuff, thermometer, etc.

I set up the play area so that Paislee could walk back and forth between her sleeping babies in the bassinets and the baby care center. I started by showing her how doctors care for babies, realizing that she had never seen a hospital nursery before. After a few minutes of playing with her, I let her explore on her own. This pretend play idea was definitely a success, and will be one we repeat many times in the future! I think this was just as much fun for her as our cooking pretend play we did last week!

Pretend Play Idea Baby Doctor

DSC_0383

Think this pretend play idea will be a hit with your little ones? I’d love to hear about it!

Also, remember to follow me for more fun playtime ideas!

Pretend Play on a Penny: The Bitty Baker

Idea for Pretend Play

Follow my blog with Bloglovin

One of my daughter’s favorite things to do is to mix and stir. It doesn’t matter what it is: water, flour, the cat’s food and water bowl— Hey, I’m just thankful it’s not the litter box! I often let her help me in the kitchen at dinner time, which is probably what encourages this fondness.

I was recently racking my brain trying to come up with a fun and fresh idea for pretend play, when I threw together this simple and free but very engaging activity. It’s so easy to set up, and doesn’t involve any thinking ahead or planning. Sometimes we make entertaining our kids too difficult, and kids are usually more excited by the simple, everyday things. After all, how many times have you heard a parent say, “They had more fun playing with the box than the toy”?

For this busy activity, you will need to raid your kitchen cabinets and pantry. Look for bowls, spoons, whisks, etc. Pull out those fancy Pampered Chef tools you never use too! The more rare an item, the more exciting it is! Search your pantry for any dry food items like flour, rice, beans, etc. I was able to find things that I had forgotten were in there, and that we’d probably never eat, and made good use out of them through this pretend play venture. I also was able to convince her to wear her adorable apron I’ve been wanting to take pictures of her in! Double win for mom!

For an easy clean up, I put a small table on the back porch and laid a splash mat underneath. You could also use a blanket. After she was done mixing, dumping, stirring, squishing, and creating, I was able to easily dump the food off the mat.

I was feeling pretty brave, so I let her add water into the mix. Though this was a little messier, she had so much fun! I have a motto about messes, “If the mess can be undone, let them play!” However, the dry ingredients were equally fun for her, so that’s a great option for a cleaner playtime!

I hope you and your little ones enjoy this activity as much as we did!

The Bitty Baker

Idea for Pretend Play

Items Needed:

Bowls, spoons, whisks, spatulas, etc.

Dry food items such as beans, rice, flour, etc.

Ready, Set, Play!

Let them mix, stir, dump, squish, grab, and create! Use a drop cloth, blanket, or splash mat underneath the table so you can focus on having fun and aren’t worried about the mess.

Also, this is a great teaching opportunity! When they are finished playing, have them help you clean up, and talk about how just like mommy, they have to clean up their mess after fun in the kitchen! You can even make a sink full of soapy water for them to “wash” their dishes in after they’re done! This will just extend the fun!

Idea for Pretend Play

Pretend Play for kids Cooking

Pretend Play for kids Cooking

I would love to hear how this pretend play idea goes for you and your little ones! Also, remember to click on the “follow me” button for more posts on playtime fun!

Creative Meals for Kids: The Carrot-Soup-Making Bunny

Creative meals for kids

Our two year old daughter, Paislee, has several nicknames. One is peanut, since she’s cute and tiny. Another is silly monkey, since she’s so silly and fun. The last nickname is the juicer, because her capability to extract the juice from her vegetables and leave a pile of pulp on her plate puts the Omega Juicer 9000 to shame.

Carrots are her juicing vegetable of choice. She will sit there and chew until the cows come home, but WILL NOT swallow them! So I finally decided to be smarter than the two-year-old! I started searching for a creative meal for kids using cooked carrots. I ended up coming up with my own recipe for carrot soup, and was excited about being able to include homemade chicken broth in the meal as well! (If you don’t already know, homemade chicken broth is a nutritional powerhouse, and is super easy to make!) However, after spending an hour in the kitchen preparing this daring, novel, two-year-old’s delight, I became increasingly concerned that this time-consuming exploit might be a complete waste. I could already see her “this doesn’t look right” stare, and could hear her “this not tasty mom” whine.

Crap.

I had to think fast, as dinner time was quickly approaching. My husband and I, in desperate attempts to get Paislee to eat, have come up with all kinds of fun, creative meals for kids in the past. So I began racking my brain and searching the internet. I couldn’t believe what I found.

We’ve all heard of the Easter Bunny, but have you ever heard of the Carrot Soup Bunny who makes soup in your kitchen and leaves it for hungry girls and boys?!! That’s right. I found a video of a man dressed like a bunny cooking carrot soup. The video is ridiculous and a gem all at the same time.

When Paislee woke up from her nap, I said, “You won’t believe what happened while you were sleeping! I saw a bunny making carrot soup!” I then showed her the video. She was thrilled. Especially when the bunny took a 10 second break from cooking for a dance off to “Ice, Ice Baby”. True story, my friends. I couldn’t make this stuff up if I wanted to.

Then in the most excited voice I could possibly compose, I said, “Oh my goodness! Do you smell that?! I think there’s some carrot soup for you too!”

She ate 2 bowls full, and kept thanking the bunny for making her soup. It was the most adorable and successful dinner yet.

I hope you enjoy this fantastically, cheesy bunny video as much as Paislee and I did! It was definitely a hit at our house, and I hope it brings you just as much success and delight!

Also, I have included my recipe for Carrot Soup.

Carrot Soup

Ingredients:

5 cups sliced carrots

4 cups chicken broth

1/2 cup Raw Milk (See my post on choosing the right milk.)

2 1/2 Tablespoons Parsley

2 1/2 Tablespoons Basil

Salt and Pepper to Taste

Directions:

1) In a medium saucepan, bring chicken broth and carrots to a boil. Reduce heat to a simmer, and cook until carrots are tender.

2) Using an immersion blender, blend soup until creamy, (You can also transfer soup to a stand blender, but do so in small batches after allowing the soup to cool a bit,)

3) Add in milk. parsley, basil, salt, and pepper to taste. Stir and allow to cook for 5 minutes on medium low heat.

4) Cooking time and temperature will change how thick or thin your soup is, so adjust consistency to your liking by adding more or less broth or milk.

4) Serve and enjoy!

Now it’s your turn! How do you get your little ones to eat carrots?

Also, remember to follow me for more healthy and creative ideas in the kitchen!

How to Raise Extraordinarily Generous Kids

Generosity Kids giving gifts

That time of the year is approaching! The time when the malls turn their A.C. down to 65 degrees and cashmere scarves adorn the window manikins, when your inbox is flooded with “The Top 10 Gift Ideas For ____” emails, and you dream of Starbuck’s Eggnog Latte. Truly the happiest time of the year!

Is it any coincidence that this is also the most generous time of the year? I think not. A 2008 study conducted by Harvard Business School professor Michael Norton and colleagues showed a positive relationship between giving and increased happiness. Their study found that spending even just $5 on someone else can make a significant difference in our happiness. This study brings light to the fact that not only is generosity an admirable character trait, but it is also vital to our well-being, making it a character quality well worth passing on to your children!

So how do we begin to cultivate a generous attitude within their hearts so that giving becomes more than just something we do at Christmas?

Be a living example of generosity

What happens when Christmas is over? Suddenly the malls go bare, spending declines, and people go back to their normal routines. The spirit of generosity vanishes, and all we are left with is a fir tree in the driveway and the familiar emptiness and melancholy after every last present has been opened. Perhaps if generosity didn’t end with the ringing in of the new year, we would find ourselves unaffected by the end of the holidays.

Many people completely miss the true meaning of generosity by thinking it is something only the “well-off” can afford to do. Generosity is not limited by the parameters of money. It is only our definition of generosity that leads us to believe that. Giving is about your heart, not your wallet. Money is not the only asset we have to give; we have our time, affection, love, service, ear to listen, or shoulder to lean on. I can’t help but think of Mother Theresa as the perfect example of this.

Being an example of true, year-long, heart-filled generosity is the most powerful way to begin to teach your children about giving, and you can do this regardless of your financial situation. Next time you write a check to that non-profit organization, make a pot of soup for that friend who’s been sick for a week, or lend your car to the single mom who’s been taking the bus, clue them in to what you’re doing and engage them in meaningful conversations about why you’re doing it! They’ll begin to realize that giving is a lifestyle, not a once a year spree.

Provide opportunities for them to give

Think back to the last time you sorted through your child’s toys or clothes for donations. Chances are good that you probably didn’t advertise the donation pile to your child. In fact, you probably waited to sort through the toys until after they were asleep, and sneaked them out into the garage in a well sealed, black bag like you were George Clooney in Ocean’s 11. There’s no shame here; we all do it!

What if we made a decision to stop hiding generosity from our kids, and instead show them that giving is something special to look forward to, not something to dread? Now I’m not at all suggesting that you fill a trash bag full of your child’s stuffed animals and make them wave goodbye as you drive them off to Goodwill! Let’s not scar them in the process of teaching them! Instead, how about starting with one item. Talk with them about how they don’t play with or wear this item anymore, and how someone else would really appreciate and use it! Even better, name a specific person who might like it and allow your child to give it to them!

I did this thing just the other day with Paislee. She had a doll that she rarely played with, that just so happened to be one of her little friend’s favorite. So I talked with Paislee about how she doesn’t play with her anymore, and asked her if she thought her friend would like having the doll at her house to play with. We also talked about how giving makes everyone involved feel so happy, and how generosity shows our “kind hearts”. When it came time to give the doll away, Paislee was so focused on how happy her friend was, that was all she could talk about! There was no sadness in giving her toy away, because she was starting to see that generosity brings joy! Even at this young age, she is realizing that “It is more blessed to give, than to receive.”

What about you? What are some things you have done or want to do with you child to teach them about generosity?

Also, remember to follow me for more helpful posts on motherhood!


Raising Healthy Eaters

Raising kids who eat great, healthy eaters

“No me like peas!” says the tenacious two-year-old. The exhausted mother replies, “But peas are soo yummy! They’ll make you big and strong! And, did you know that mommy eats peas, daddy eats peas, brother eats peas….” While the mother is completing the list of all humans and animals who eat peas, plus throwing in a threat from Santa Clause, who clearly doesn’t bring non-pea eaters presents, the two-year-old then surmounts the mother’s plea with folded arms, a “this is war” stare, and a firm “No.” Knowing the strength and determination of her pint-sized opponent, the mother sighs, retreats, and goes for the reliable pea substitute, Goldfish. Another battle lost, and another strike against poor old Santa Clause.

Can you relate? If you’re a mother of any age child, chances are good that you’ve fought a few food battles. And because we have a primal instinct to nourish our children, we will go to any length to get them to eat. So how do we encouraged healthy eating but avoid the battles? Here are a few strategies to help cultivate good eating habits in your children.

1) Let Them Grocery Shop

Just like us adults, kids like being a part of decision making. As children, so much is already decided for them like what they wear, where they go, or who they see. So when you give the opportunity to decide something for themselves, they’ll rarely turn you down! Use this to your advantage when picking out produce! Instead of choosing that week’s vegetable for them, ask them what they’d like to have! Try taking them to the frozen vegetables and allowing them to pick two bags they’d like to try. That way when peas show up on their dinner plate that week, it’s no longer a battle between what mom wants me to eat and what I want to eat.

2) Let Them Help Cook

When you allow your children to cook with you, not only are you passing on recipes, techniques, or your joy for cooking, but you’re also introducing them to new flavors and making them feel more involved in their dinner menu. When Paislee and I cook together, it always amazes me how adventurous she is in trying new things. She’ll often ask for a taste of raw garlic, a lick of the lemon slice, or even a sprinkle of cinnamon. If I were to give her a plate of these items on her table, she’d probably turn up her nose and try and feed it to the cat. However, since these items are not being forced on her, but instead just left out on the counter for her to choose to taste, she goes for it! Now she’s inheriting my love for cooking and expanding her palate all at the same time!

3) Play with Their Food

Whoever said that we shouldn’t play with our food, obviously never sat through dinner with a toddler. Some of my favorite memories from mealtimes growing up include Bugs Bunny shaped waffles, sandwiches cut into pinwheel shapes, and ants on a log. It was my mother’s creativity with these foods that made them magical! Simply changing the appearance of dinner also changes the mood of dinner. It becomes fun and inviting! When food at a restaurant comes out perfectly plated and garnished, it entices us and makes our dinner more enjoyable. So think of this as garnishing your child’s plate! Make Mickey Mouse heads out of rice balls, bunny faces with carrots, or whatever your inner-child can think of! Maybe even make a game out of it. We like to pretend broccoli gives us turbo-speed at our house, and will run around the kitchen after eating! Have fun with it!

4) Try, Try Again

I have a rule we use in my house, you must try something 3 times before you can dismiss it. This means that for any food item, you have to allow me to make 3 separate dishes that include that ingredient, before you can say, “No thank you” to that food. This rule started with my husband when we first got married, as he was not fond of my “rabbit food” cooking! However, now I’m using the same rule for myself as I prepare food for Paislee. There are plenty of foods that were a complete bust the first time I tried them with Paislee. You would have thought I gave her gasoline if you saw her face after tasting avocado. I didn’t give up though! I kept trying, and now she LOVES avocado! Make a decision to serve food items AT LEAST 3 different times to your child before giving up! Sometimes they just need to acquire a taste for it.

What about you?! I want to hear your tips for raising great eaters! What crazy things do you do at dinner time that your kids love?

Also, make sure that you click on the follow me button on the top right of this page for more helpful articles regarding the home, children, and motherhood!

A Delightfully Sweet Lesson on Self-Control

Self-control Cookies teaching children

Think back to your kindergarten classroom. Picture the walls. Do you remember the crayons displaying color names, the alphabet train, or the board displaying your prized artwork? How about the most important poster in the room, the class rules? Oh yes, the one your teacher would refer mischievous little “Jimmy” to about 40 times a day while stating the number one class rule.  Say it with me now, “KEEP YOUR HANDS TO YOURSELF!”

If I had a dollar every time I used that phrase while teaching kindergarten—well let’s face it, I still wouldn’t get paid enough as a teacher! So let’s just say I used that phrase a lot.

Self-control is one of the hardest concepts to teach children, and seems to be the hardest for them to grasp. Young children discover their world by using all of their senses, and are testing their boundaries while doing it. It’s important to allow your child to play, observe, interact, and discover new things on their own, but teaching them to use self-control is equally as important! Self-control is crucial to their success and well-being as adults. If you’ve ever met an adult without self-control, you know what I mean!

Here’s a quick and fun lesson to do with your little ones to help them grasp the concept of self-control!

Lesson on Self-Control

What is self control to children? When you’re in a tough situation and you’re able to keep yourself from doing harm, or able to hold back while waiting patiently for a reward

What you will need- 

A bag of your child’s favorite treat or reward (Cookies, raisins, quarters, or if you’re my daughter, coconut date rolls!)

A plate

How to start-

Sit at a table with your child. Place the plate in between you and your child, and hold the bag of treats in your hand. (For the purpose of this lesson, we’ll say it’s a cookie.) Tell your child that you want to give them a cookie, and place it on the plate in front of you. Before handing them the plate, tell them that if they would like, they can eat the cookie now and be done. However, if they want to wait, you will put another cookie on the plate in one minute, and then they can have two cookies! You can shorten or lengthen the time depending on the age of your child.

The very young child may have a hard time understanding, and will probably take the cookie right away the first time you do this. It may help to have an older child or adult sit next to them and show them what happens when you wait. It won’t take long for them to catch on!

If you child decides to wait, be sure to keep encouraging and praising them for the use of self-control during the lesson as they wait. Help them to understand that using self-control in a tough situation is something to be praised! If they don’t wait, do not reprimand them, Keep in mind that this is TEACHING not correction. (See my post on the importance of teaching versus correction here.) Explain to them that you understand how tempting that cookie was, and that it must have been hard to try and wait.

Regardless of if your child waits or eats the cookie right away, talk with them about self-control after the lesson is over. Explain to them what it means to use self-control and how it can be helpful in life. Give examples of when and how they can use self-control over their emotions and actions: like when someone makes them angry, when they are saving their money, or when there is something that they want but can’t have. Remember that kids don’t always hear everything you say the first time. Surprised? Ha! Probably not. So the more you repeat a lesson, the more they’ll remember it and the better they’ll be able to grasp the concept!

As with any lesson, go as heavy or light into the lesson as you need. Know your child’s level of understanding and attention span and feed off their response. Don’t be afraid to completely stop a lesson if it’s not working at that moment, and make sure you’re having fun with it! The more fun you have, the more likely they are to remember it!

I would love to hear your comments on how this lesson goes with your little ones! Remember to click on the follow button on the top, right hand size of the page to stay up to date on new lessons and other helpful posts!

Photo Credit: Pretty In Print